In yesterdays post I showed the crew of the Tiger I have just completed.
Well today's post is about puting a name to a face. OK so they are not actually the real people but this is a model representation as is everything in miniature so use a bit of imagination!
Starting with the aimer/gunner, this is SS-Unterscharführer Karl Wagner, SS-Sturmmann Günther Weber as loader, SS-Unterscharführer Heinrich Reimers is the driver and SS-Sturmmann Rudolf 'Rudi' Hirschel is the missing crewman, obviously either inside listening to the radio or gone for a wee! I will be adding 'Rudi' soon to complete the crew.
These men were all part of a crew which had an amazing record which was brought to an abrupt end through a shell of a Canadian Sherman. This knocked out the tank but it is not certain if this killed the men inside or just stunned them. Either way, a few seconds later, the main fuel tank, which was probably ruptured by the first hit, exploded and set off most of the stored ammunition in the tank. This blew off the turret and it landed not so far from the tank but left all of the crew dead inside.
This was in tank 007 which was one of Wittmann's main command tanks but he did swap to others (like 222 in my model) when his were unservicable.
Around 1300 on 8th August 1944 5 men of outstanding skill and bravery perished inside one of the most efective machines of the war but the legend of one of the greatest Panzer Aces of WWII was born.
Thursday, 22 December 2011
Wednesday, 21 December 2011
Back on the Prowl
1/35 Tiger tank with crew
I'm Back! Well for now. Christmas is always mad and waiting for a baby to be born while I write this is making it all the more hectic.
But it is with great pleasure that I can say I have actually finished a model! Yes that is correct it is actually done! And I am very pleased with it as well.
It is based on a late version Tiger I of the 101st Regiment of the 1st SS Panzer Division "Leibstandarte SS Adolf Hitler". The tank, 222, was commanded by Michael Wittmann for a time in Normandy and it is said to have been used in one of his daring raids on Brirish columns. It also includes figures of Michael Wittmann himself along with the aimer (standing lighting a pipe on the roof of the tank), the driver (sitting above the driving position) and the loader (leaning on the front of the tank). These all wear the later uniforms including the Pea Dot camo which takes around 2 hours per figure to apply! The figures are from the Tamiya and Zvezda tank crew kits (available here http://www.ehattons.com/47995/Tamiya_35201_German_Tank_Crew_at_Rest/StockDetail.aspx). The kit used for the tank itself is the Tamiya Late Tiger I (available here http://www.ehattons.com/47793/Tamiya_35146_German_Pz_Kpfw_VI_Tiger_I_Ausf_E_late_version_with_figure/StockDetail.aspx) with Eduard etched brass zimmerit coating, Dragon numeral decals and a Tamiya MG42 on the AA mount on the turret.
I will cover the weathering of the tank in a future article (dont wait up!) but for now have some pictures of it.
 |
| The crew at rest waiting for more orders |
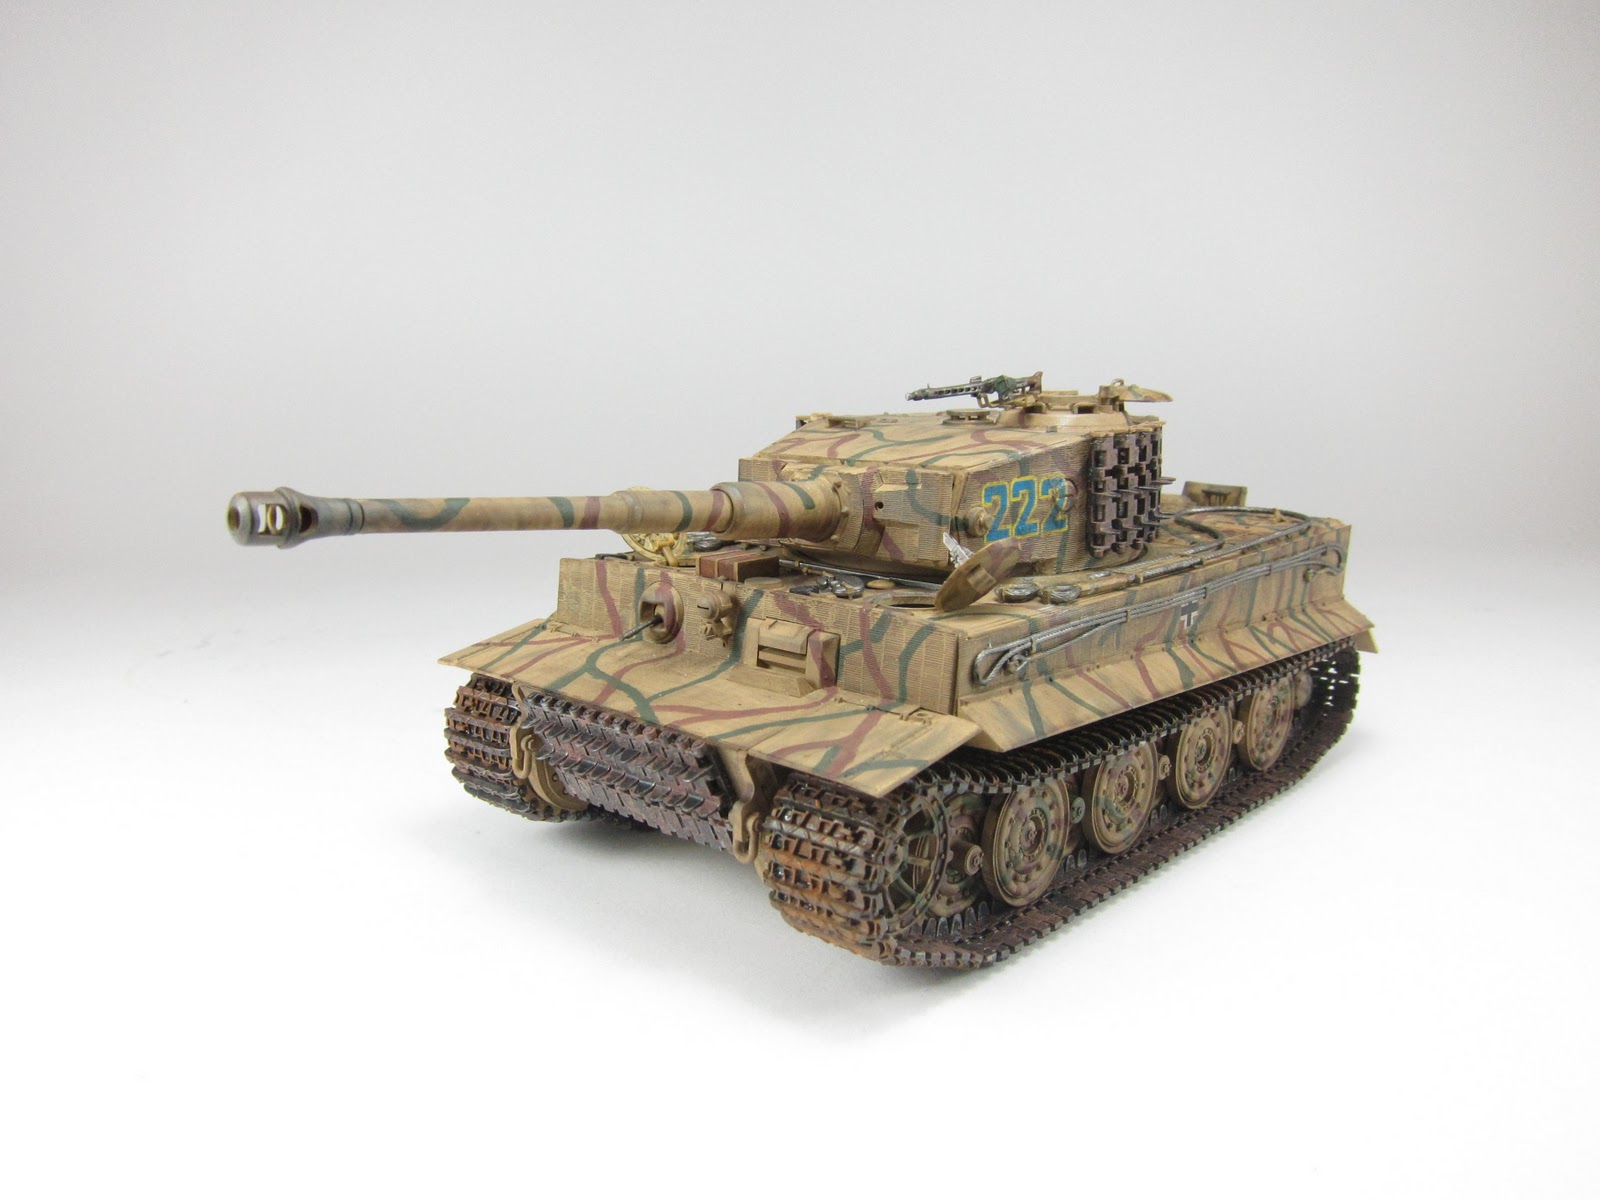 |
| The tank itself, a slightly modified Tamiya kit |
 |
| Worms eye view! |
 |
| Additional to the instructions, I have added the extra track links to the front. |
 |
| The Plainer side of the tank |
 |
| Rear of the tank with late exhaust guards fitted |
 |
| More 'busy' side with track pulling cable and spare links on the turret |
 |
| Loader, driver and Hauptsturmführer Michael Wittmann, the commander. |
 |
| Main gun aimer |
Friday, 28 October 2011
I've started so I'll finish.....
Why do I keep finding kits I never knew existed but now I must have?! It's an addiction but i think I'm on the brink of either overdose or detox I'm not quite sure. See I've added another 4 kits since my last post about my stash and modelling-wise I have achieved the fixing of the undercarriage on one Tornado. Now stepping back I can see the imbalance and so the time has come to put the kit buying chastity belt on and get down to it!
The plan is to finish off my Tornado's and the decals on all of my other had finished projects (as well as other bits) do I can display them properly. It's actually starting to annoy me that I have half finished models waiting on the nice shelves screaming to be done.
So the 1:72 will come first, that's the 2 Tornado's GR1 and F3) the Phantom (FG1) the Buccaneer, the Gannet (MK4) the multitude of Spitfires and the few German aircraft I have.
Now I can see some of you shaking your heads, 'never going to happen' your saying, but no, I have decided it is going to happen or I will never finish anything and this is just the kick up the arse I need to give myself! So first task is to paint the Tornado GR1 in green and grey, I've got everything for it so this weekend it's all systems go.......
Oh hang on wasn't there that wessex kit on eBay?...........
Monday, 24 October 2011
A tale of two Tornado's
Well I showed in my last blog the Tornado which I was starting, the Revell F3, well a trip out on Thursday meant I doubled the build, with a Revell GR1! I bought it to do as a dual build as I guessed they would be of the same pedigree and I was very pleased at the look of the F3, well I opened this one and I was astonished, the detail is out of this world and I am sure to buy more of these. I will go in depth a bit more another time but for now here are the 2 together (GR1 F3) and a pic of the GR1 cockpit.


Thursday, 20 October 2011
Stash in the Attic
All kit modellers have them, and I think we all actually love to have them. The inevitable stash is the pile of our aspirations, of trips to shows and shops with the thoughts of 'Oh go on, its not too expensive' or 'Well I really want an X to go with my Y' or even 'Weeeeell she'll never notice at home if I get this one!'. We have all done it for one thing or another but kits just seem so easy to keep buying.

My stash has transformed over the last couple of years, if you asked me last year what was in my stash it would have been just 1:72/1:76 German vehicles and figures. Well its moved on quite a bit now! I still have most of the figures and a few vehicles left but until I can find a suitable diorama or other excuse to build & paint them they will be staying where they are. That is my 'stored' stash, kits which will not see the light of day for a while for whatever reason, but I may bring some of the vehicles out of the store if I find I have display room.
So on to my 'active' stash, all of the goodies which I have collected for immediate building. This does not include kits which I have started, they have their own pile! (Which seems to be increasing, I must get around to getting somewhere to put these on display so I have the morale to finish them!) The stash is as follows:

1:72 Aircraft
Revell
04375 Panavia Tornado F.3 Advance
04164 Supermarine Spitfire MkV (clipped wing) EP120 A-AE
04132 Hawker Siddeley Sea Vixen FAW.2
04338 Eurofighter Typhoon Twin Seater
04615 McDonnell Douglas F-4F Phantom II
04354 McDonnell Douglas F-15D Twin Seater
Airfix
A02017 Supermarine Spitfire PRXIX PS888
A02082A Hawker Hurricane MkI
Ark Models
72032 Westland Wessex Mk.1 (With Eduard detailing kit)
Heller
241 Arado Ar196a
Admiral
ADM7209 Supermarine Seafire F.45
1:48 Aircraft
Airfix
A05121 BAe Hawk T1
A11002 DeHavilland Sea Vixen FAW.2
Tamiya
61058 Douglas A-1H Skyraider
1:32 Aircraft
Hasegawa
JS-073 Messerschmitt Me109E (2 sets of decals extra!)
1:35 Military
Tamiya
35196 German Frontline Infantrymen (SS)
35009 Panzerkampfwagen II Ausf. F/G
Trumpeter
00401 12th Panzer Division (Normandy 1944) figures
Academy
Panzerkampfwagen IV Ausf. H/J
There's quite a bit there to be getting on with as you can see! I'm not one of these people who tries to put a timescale on these things, they will be done when they are done and I prefer it that way. But which one to start first? i think it will be the Tornado F3 or the Wessex, I'm in the mood for some Super Detailing! Keep a lookout as I'm sure all of these will make it to the blog at one stage or another.
In the Office - Part 1
'The Office' is a phrase used by a lot of pilots instead of Cockpit. I think most of them use it as an ironic term to make the place they spend most of their time sound more 'normal' but nothing that goes on in here is anything like the average office!
In a kit this is the place I tend to spend most of my time. I feel that the more detail that can be included here, the better the model will be (obviously) but a well detailed cockpit will finish a model off whereas a badly detailed or unfinished one sticks out like a sore thumb and will ruin even the best model.
I detail depending on visibility, an open cockpit will be fully detailed, but the likes of the Vulcan or Victor will get a very sparse cockpit as there are only tiny windows and no openings.
So to my next project (I know I have figures on the go as well but I can only take so much at a time!). I am going to construct the Revell Tornado F3 in 1/72 and from looking it over it seems to be a fantastic kit. The fist thing I try and do is find pictures of the cockpit and a well thumbed issue of Airfix Model World has yielded a few fantastic images (the build is of the Hasegawa 1:48 model), it's amazing what you remember seeing months after you saw it! I will use the transfers in the kit as well as painting and weathering with acrylics and washes to get the best effects and this will be an 'in use' cockpit as will the plane (I don't like clean aircraft!).
I will start with the base grey colour on the parts then construct all but the seats and add transfers then the seats (painted separately) and finally weather.
Anyway it's late and I'm off to get more for the stash tomorrow so it's time for bed! I'll try and update on the new additions soon.
In a kit this is the place I tend to spend most of my time. I feel that the more detail that can be included here, the better the model will be (obviously) but a well detailed cockpit will finish a model off whereas a badly detailed or unfinished one sticks out like a sore thumb and will ruin even the best model.
I detail depending on visibility, an open cockpit will be fully detailed, but the likes of the Vulcan or Victor will get a very sparse cockpit as there are only tiny windows and no openings.
So to my next project (I know I have figures on the go as well but I can only take so much at a time!). I am going to construct the Revell Tornado F3 in 1/72 and from looking it over it seems to be a fantastic kit. The fist thing I try and do is find pictures of the cockpit and a well thumbed issue of Airfix Model World has yielded a few fantastic images (the build is of the Hasegawa 1:48 model), it's amazing what you remember seeing months after you saw it! I will use the transfers in the kit as well as painting and weathering with acrylics and washes to get the best effects and this will be an 'in use' cockpit as will the plane (I don't like clean aircraft!).
 |
| Always try and find a source of info for the kit your are modelling, even if it is not the same scale there will be useful things you can take away from an article. |
I will start with the base grey colour on the parts then construct all but the seats and add transfers then the seats (painted separately) and finally weather.
 |
| The detail in the real cockpit is immense and will be a task to replecate in 1:72! |
Monday, 17 October 2011
Soldiering On - Constructing 1/35th figures
I seem to have concentrated on these 1/35 figures recently, I think it's because they go together well and, more importantly, quickly!
This is my first blog tutorial and I hope to show you some simple techniques and tricks on how I do things. These will not be difficult to achieve and this tutorial only took around 2 hours for me to complete including taking photos so it will not take too long.
The figures I am using today are the standing models from the Tamiya BMW R75 motorbike kit (35016).
The equipment you will need is shown below. Some things are worth spending some money money on such as the scalpel. You can get cheap disposable ones but I always find these to be flimsy and not accurate enough. I use a Games Workshop one, it is not the cheapest but it has a good weight to it and also comes with a ton of blades. Also brushes are important. I got the grey one with some others of the same type from an art shop as they are fairly cheap but better quality than the kit manufacturers ones you find in model shops.

The first thing I always do is to paint all parts of figures on the sprue including equipment. This helps make sure everything is painted and also that paint does not find its way into places it should not be. I usually paint the base colour (in this case green) and then add things like flesh and straps etc. This just means it is easier to paint as ye tend to be more careful when painting smaller areas. I don't mask these models as I find the time it takes does not justify the results.

Once everything is painted and dry I cut the parts off the sprues. I start with the main torso and then the arms/legs (the legs are part of the torso on this one). I will also fit anything that goes on the arms (weapons, equipment etc) so the arms can be positioned exactly.

I use a plastic plate from Ikea to keep a small amount of poly-cement on and a small pin to apply it. This helps to keep glue to a minimum and stops runs.

The main character is now complete enough to see what it will look like and to start to think about equipment placement. Now the instructions are a great place to start but they usually either show rigidly 'accurate' placement or completely inaccurate positions for these things. I prefer to look at images for this as you cannot get more accurate! Also colours for equipment can vary greatly the later in the war you get, 1944 you had Eastern and African front vets in Normandy and they would have old kit with them. Gas mask tins can be green, tan, grey or even white for Russian winter camo colours. Another piece of equipment which can change is the mess tin, they were issued in green or tan but can be personalised in the field and camo'd up or painted with personal details or unit logo's.

Once all details are added its time to touch up any parts that have lost paint or been glued.

The above can now be done on the other figure and then everything can be checked.

Now these figures can be added to the others ready for weathering (which will be covered in another blog) and positioning in a diorama.

This is my first blog tutorial and I hope to show you some simple techniques and tricks on how I do things. These will not be difficult to achieve and this tutorial only took around 2 hours for me to complete including taking photos so it will not take too long.
The figures I am using today are the standing models from the Tamiya BMW R75 motorbike kit (35016).
The equipment you will need is shown below. Some things are worth spending some money money on such as the scalpel. You can get cheap disposable ones but I always find these to be flimsy and not accurate enough. I use a Games Workshop one, it is not the cheapest but it has a good weight to it and also comes with a ton of blades. Also brushes are important. I got the grey one with some others of the same type from an art shop as they are fairly cheap but better quality than the kit manufacturers ones you find in model shops.

The first thing I always do is to paint all parts of figures on the sprue including equipment. This helps make sure everything is painted and also that paint does not find its way into places it should not be. I usually paint the base colour (in this case green) and then add things like flesh and straps etc. This just means it is easier to paint as ye tend to be more careful when painting smaller areas. I don't mask these models as I find the time it takes does not justify the results.


The main character is now complete enough to see what it will look like and to start to think about equipment placement. Now the instructions are a great place to start but they usually either show rigidly 'accurate' placement or completely inaccurate positions for these things. I prefer to look at images for this as you cannot get more accurate! Also colours for equipment can vary greatly the later in the war you get, 1944 you had Eastern and African front vets in Normandy and they would have old kit with them. Gas mask tins can be green, tan, grey or even white for Russian winter camo colours. Another piece of equipment which can change is the mess tin, they were issued in green or tan but can be personalised in the field and camo'd up or painted with personal details or unit logo's.


Next, how to tackle the Pea-Dot on my SS figures!
Subscribe to:
Posts (Atom)